
When you want a bit of cozy in your space, but you don’t want the toxic chemicals or hefty price tag of a luxury store-bought candle, consider preparing your own unscented beeswax and coconut oil candles. They are super easy and beautiful in any space.

I love creating cozy spaces throughout my home, including little areas that feature candles, flowers or plants, Scripture cards, and decorative matches. There is almost no better way to create coziness than with candles. I especially love them in the early morning before the sun comes up. During my quiet times with God, I enjoy lighting candles and creating a welcoming atmosphere. Check out my YouTube video on Creating a Morning Sanctuary.
Candles in my home also signal the shift between the “school” day and the evening time. At 4 PM, we put all the books away, return the room to “starting position,” catch up on some free time, and then proceed with the evening chores and dinner prep. The candles are lit, the soft music comes on, and I enter my kitchen sanctuary. Everyone goes about their own free time, and the house quiets a bit…at least until dinner is called.
I love candles, but I don’t love the toxic fragrances added or the hefty price tag that goes along with a luxury candle. Fragrances, although they may smell clean or pleasant, can pose various health risks if they are synthetic or not derived from essential oils. These toxic chemicals, many of which are often undisclosed, can trigger allergies, respiratory issues, and some are even endocrine disruptors. All that to say, I keep my candles unfragranced by preparing my own beeswax and coconut oil candles, and I reserve the fragrances for my essential oil diffuser.

Beeswax & Coconut Oil Candle Recipe
This is a truly simple recipe that has consistently yielded beautiful candles for me. Check out my Reel on Instagram for reference, if you’re a visual learner like me. This recipe is for an unscented base made from beeswax and coconut oil. I prefer the scent of raw beeswax, so I do not add scent to my candles. However, feel free to add essential oils to your base after the wax has melted and been removed from the heat.
- 1 cup Coconut oil
- 1 pound of beeswax
- 25 drops of essential oil of choice (optional)
Directions
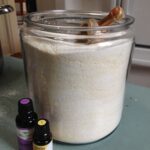
In a Double Boiler Wax Melting Pot, melt the wax and coconut oil together on medium-low heat. I use a skewer to stir so I can toss it and eliminate extra dishes. Wax is hard to remove from dishes; thus, I use the double boiler. Ultimately, all you have to do is wipe it clean with a paper towel after use since it is a dedicated candle-making pot.
Prepare your candle vessel with a wick sticker centered in the middle of the jar. There are several kinds of wicks you can use. Ultimately, it comes down to your preference. With larger vessels, I prefer using the crackling, wooden wicks. For my tea cups or recycled ceramic yogurt containers, I like the cotton wicks. If using wooden wicks, double them up and soak in olive oil to help improve the burning process. This is not a necessary step, but it is what I do.
For the cotton wicks, you will need to stabilize them so they dry straight and evenly. I do this by placing a pencil on either side of the wick, or you can purchase metal wick holders inexpensively. With the money I save by preparing my own all-natural candles, I invest in making the process easier. After your wax is melted and your jars prepared, pour the wax and allow it to set undisturbed for a few hours. Trim your wicks and enJOY!
A Special Note on Using Fragrances
Note: If you are adding essential oils, please wait several weeks before burning to allow the fragrance to integrate with the wax fully. Curing allows the fragrance oils to fully bond with the wax, maximizing the scent that is released when the candles are burned. If you omit any fragrance additions, feel free to burn your candle after it is set.
Crackling Wood Wicks


Truthfully, I love the look of the wooden wick, but they can be a bit noisy. Ultimately, I save the wooden wicks for my larger containers and place them in the living room or dining room. They can be a bit distracting at the bedside in the evenings when you are relaxing with a cup of tea and a good book. Just say’n.
Occasionally, I found them difficult to light as well. I’m not sure why this is, but I suggest keeping a box of cheaper matches around in case it takes a few matches to light. You wouldn’t want to waste those beautiful decorative matches, strike after strike. Ultimately, I found them worth the extra matches because I keep making them. I love the sound they make while I am cooking dinner in the kitchen.

Candle Care
There is more to lighting candles than a simple strike of a match. When you properly care for your candles, they will last you significantly longer. A Candle Care Kit is not necessary, but it sure looks pretty and creates a sense of ceremony. It contains three very useful tools to aid in proper candle care: a snuffer, wick dipper, and wick trimmer.
Trim Your Wick
Before lighting your candle each time, make sure to trim your wick to 1/4″ before lighting to prevent a large flame, soot, or “mushrooming” that develops on the end of the wick. Plus it allows for more even burning.
Candle Burning Time
When burning the candle, it is essential to let it burn long enough for the wax to reach the edge of the container. This will prevent tunneling, or that ring of unmelted (and wasted) wax around the edges. So keep this in mind when lighting the candle. Will you have enough time to let it burn long enough?
Extinguishing the Candle
Finally, the Candle Care Kit has either a snuffer or a wick dipper. Obviously, you can’t dip a wooden wick, but a wick dipper can easily extinguish the flame of a cotton wick by dipping the wick into the wax and pulling it back up again. The snuffer is the best way to extinguish a candle because it prevents blowing hot wax or soot about the room and keeps the smoke at bay. Now you can consider yourself an expert candle keeper.

Cotton Wicks
Cotton wicks are traditional and possess a simple beauty. If using a larger container, you will need to increase the number of wicks so that the wax burns down evenly. My containers ranged from 4 to 7 oz in size, so I only needed one wick. They are a little trickier to work with when pouring the wax because they can shift or dry crooked, as opposed to a wooden stick that stands straight. However, this is easily remedied by wrapping it around a pencil or setting it with a metal wick holder. I do recommend the wick stickers and holder, as it makes the DIY experience more pleasant, especially if you make them as often as I do.

Great Summer Project
Candle making is an excellent project. I love to prepare my beeswax and coconut oil candles with my children in the summer when it is hot outside. Then, we have candles stocked up and ready for fall and winter. Plus, it’s a fantastic project to do in the summertime when moms and kids are looking for something fun to do that’s more productive than screen time.
Just an FYI sidenote, but Cindy from Our Journey Westward has an amazing online nature study program called No Sweat Nature Study, which she runs year-round. Together, my son and I participated in a lesson on bees, read a few books on the subject, colored some beautiful pictures of a hive, and then proceeded to make these candles using pure beeswax. It was a fantastic day spent with him. We learned something together and stocked up on some candles. I would say that was a win-win.
Have fun. Be safe. EnJOY!

Check Out These Related Posts:
Cutting Costs and Detoxifying Your Home (Including a Homemade Laundry Detergent Recipe!)

Transform Your Home Into a Seasonal Haven

Seasonal Meal Planning with a Menu Board
Love Your Lips Nourishing Lip Balm

Winter Tallow & Honey Butter Face Cream

Shop This Post:
Metal Candle Wick Holders with Wick Stickers (not necessary but oh, so helpful)
Beeswax. This link is for two pounds, which is enough for two recipes (about 5-10 candles, depending on your container size).
Coconut Oil- I purchase in bulk at Costco.
The Glass Jars I saved from previous candles I purchased from Grove Collaborative, but you can use any 7-oz candle-safe container you prefer, such as these from Amazon.
Double Boiler Wax Melting Pot -(Best for easy clean-up. Just wipe clean. I use this for making candles and lip balm)
Emily Lex Truth for Today Cards (just because they are in the picture, and I love them so much)
In everything you do -eat, play, and love- may it always be Seasoned with Joy!
This post contains affiliate links, which means I make a small commission at no extra cost to you. Unless stated otherwise, I will only recommend products I personally enJOY. See my full disclosure here.